Most RVs have two different types of electrical systems: 12 volt and 120 volt. Except for things like the
external lights supplied by juice from the
umbilical cord), all other 12v systems are supplied
by the battery(s) contained in the rig itself. 120v are supplied by
so-called "land line" or "shore" hookups, the type you find at any full service campground. The
term shore power comes from the boating world, where boaters tie up to a dock or pier and plug into
hookup boxes. Interestingly, the plugs and receptacles used for boats are pretty much the same as we RV-ers use.
These discussions cover everything you need to know about the 12v system in your rig, like battery types
and the 12v fuse panel. We'll even cover some things you might not even know you have, like the converter,
battery disconnect switch and trailer breakaway gadget. After that we go into
various maintenance routines to keep your rig's electrical system humming. Finally, we provide some
suggestions regarding what to do when inevitable electrical problems crop up.
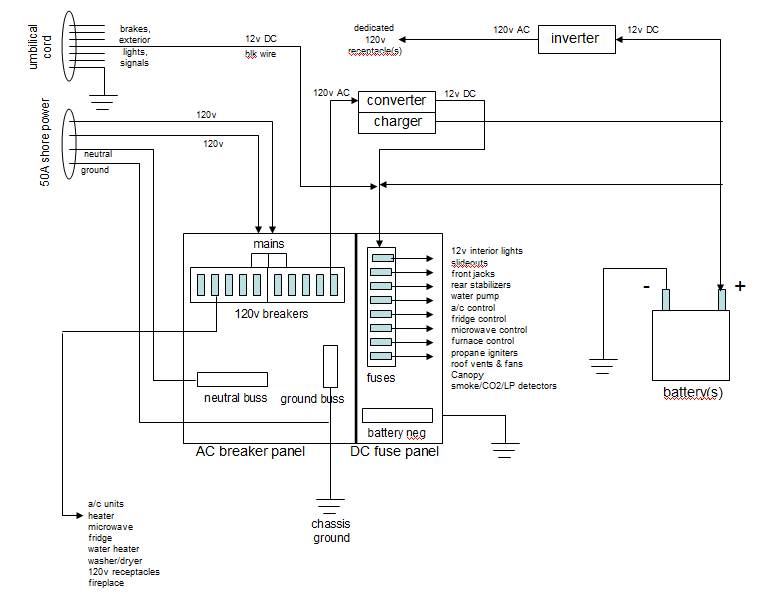
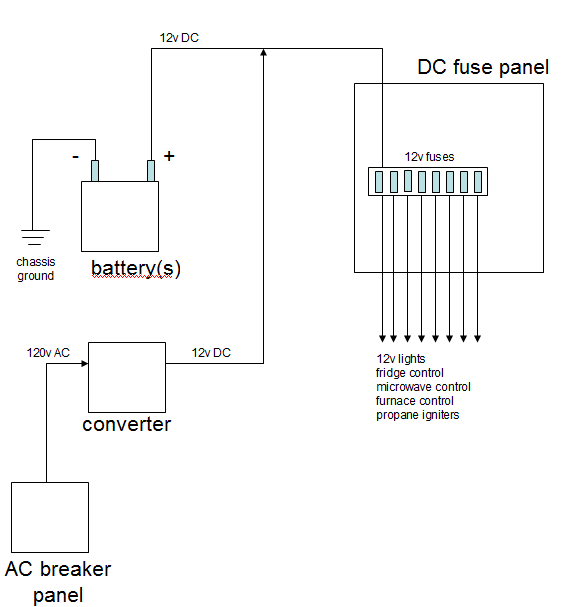
To help you follow along, here is a diagram of the 12v and 120v electrical systems in our particular fifth-wheel.
Your's may be different but it will likely be similar. If you have an electrical diagram for your rig or can find
one on the 'net then use that one. Click on the diagram below to enlarge it, or
click here to see it in a separate window.
|
|
[click to enlarge]
|
If you're into gore, here's a rather sophisticated
example diagram of a motorhome with a generator, converter, inverter,
multiple batteries and solar panels.
Here are quick links to the various subjects we will be discussing on this page:
Wire gauges
If you plan to do any wiring in your rig, it is vital that you understand the importance of
wire sizes, referred to as
wire "gauges". Any wire has a property called "resistance", which simply means that any wire has a tendency to
resist current flow. As electrons pass through a wire it heats up. For a given current, the smaller the wire's diameter the more heat it will give off. Consider the old
style incandescent light bulb. The filament inside is a very thin wire which gives off light as current runs through
it. It also gives off heat, as anyone knows who has tried to grab an old-fashion 100 watt bulb after it's been on for awhile.
The problem is that as a wire gets hotter and hotter it can become damaged, or worse, actually burst into flame.
As you might imagine
this wouldn't be good for your rig! This is why choosing the proper wire gauge for your application is important.
Safe wire sizes are a factor of the length of the wire as well as the amount of current that will be flowing through it.
Always look up recommended wire gauges before you install any equipment in your rig.
Again, the internet is your friend.
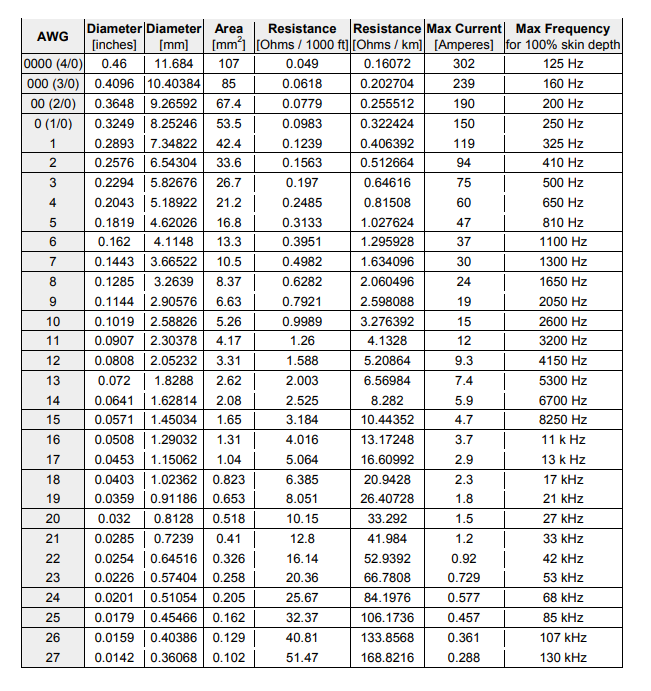
Here is a chart from
Solaris Technology Industry, Inc of
wire gauges needed for different current levels (in amps). Unless you're an electrician, the only two columns you
would be interested in are the ones for wire gauge and amps. Click on the diagram below to view a readable version.
|
|
[click to enlarge]
|
| ☞ | |
Contrary to intuition, wire gauge numbers get smaller the thicker the wire; that is,
increasing gauge numbers denote decreasing wire diameters. So "gauge" is essentially an inverse measure of a wire's
cross-section. Curiously, the original meaning of
gauge referred to the number of times a wire had to be drawn through the forming apparatus to achieve the
desired thickness. 30 gauge wire had to make more passes through the drawing dies than an 8 gauge wire.
|
The cross-sectional area of each gauge is an important factor for determining its safe current-carrying capacity
(its "ampacity"). That's why having the proper gauge wire is critical for any wiring project.
The American Wire Gauge (AWG) tables above are for a single, solid, round conductor.
The AWG of a stranded wire is determined by the
cross-sectional area of an equivalent solid conductor. Because there are small gaps between the strands,
a stranded wire will always have a slightly larger overall diameter than a solid wire with the same gauge.
You will see the term "heavy gauge" wire. Again, contrary to
intuition, the heavier the gauge, the lower the gauge number. Hence, an 8-gauge wire is "heavier" than a 10-gauge wire.
The term "heaviness" refers to the amount of current it can conduct without overheating. But note that heavy gauge
wires are heavier in the physical sense also.
| |

|
The table above applies to both AC and DC currents.
Most of the gauges you would be working with run from #7 thru #21. You can always use a thicker wire
(lower gauge nr) than shown as long as the wire fits into its connection. Keep the following rule in mind:
the higher the amperage flowing through the wire, or the longer the wire, the thicker the wire needs to be.
Be aware that braided wires can carry more amperage than solid wires.
Standard jumper cables usually have a 6-gauge rating.
There is actually another wire gauge standard, the Society of Automotive Engineering (SAE).
See here for comparisons
between that and the AWG standard. When you purchase wire you should know the difference between the two.
If you want to determine any of the wire gauges in your rig, here is a wire gauge
measurement tool available at Amazon. One good thing about it is that you don't have to disconnect a wire
from a circuit to use it. And it's cheap. But in order to get an accurate gauge measurement with any tool, it's best to
strip off insulation and measure the bare wire, but make sure you turn off the current first!
12 volt RV systems
You may be surprised to hear that your 12 volt system is much more
important to your rig's sense of well-being than the 120 volt system, but it is. You can camp without access to 120v,
as dry campers and boondockers can attest. You can live without A/C or TV. Your fridge can run on propane.
You can cook with propane. You can heat water with propane. But you'll have a hard time getting along without 12v,
with which you can at least
have ceiling lights, your slideouts will work, and you can ignite the burners on your propane stove, fridge or
water heater.
When discussing RV batteries you often see the terms "vehicle battery" and "house battery". A vehicle
battery is the one in either your tow vehicle or, if you have a motorhome, the one used to start the motor.
The vehicle battery also supplies juice through your
umbilical cord for things like your brake
lights and turn signals while you are driving.
A house battery is the one your rig lives on while you're camping. It supplies the voltage for your interior
lights, slideouts, jacks and so on.
The following items all depend on having 12v access to your in-rig (house) battery(s).
The length of the list may surprise you.
- 12v lights: ceiling, basement (but not exterior)
- Front jacks
- Rear stabilizers
- Slideout motors
- Fresh water pump
- Smoke, CO and propane leak detectors
- Awnings
- Refrigerator control
- Air conditioner controls
- Furnace control
- 12v propane igniters
- Stove hood fan
- Ceiling vents and fans in kitchen and bath
When you think about it, many of the items in the above lists are necessary
if you go dry camping (aka boondocking) where you might not be able to connect to a 120v source.
The following items are all supplied by your tow vehicle's
umbilical cord rather than the rig's house battery.
- Brake lights, backup lights, side lights, turn signals
- Brake control
- Trailer brakes (but not the breakaway cord)
Here is
a diagram showing how a typical fifth-wheel 12v system is distributed throughout
your trailer.
Batteries
|
Your rig needs a good quality deep cycle RV or marine battery. Do not attempt to get away with a cheaper
car-type battery - it won't work!
Car batteries are designed to crank engines, and thus supply a large cranking current with what is
called high "cranking amps".
This is simply not a requirement for RVs since they won't be cranking anything. But note that motorhomes do,
and have separate batteries of their own called vehicle batteries.
Vehicle batteries depend on a vehicle's alternator to constantly recharge them.
Unlike car batteries, deep cycle batteries are designed to be regularly
depleted and then recharged. This is exactly what you need, for example, if you go
dry camping where you may run the battery down and then recharge it again and again,
possibly by a generator.
Be aware that a deep cycle battery takes a long time to re-charge, quite a bit longer
than a car battery. In fact, it may take up to 24 hours to fully charge.
| ☞ | |
On most rig batteries, a white wire runs between the negative battery post and the frame, and another white wire
runs between the battery and the negative terminal of the 12v fuse panel. A black
wire is connected to the positive battery post and runs to the positive terminal of the
12v fuse panel. See the 12 volt
distribution panel discussion below.
This is similar to normal house wiring where white is neutral and black is hot.
On some rigs there may be a red wire rather than a black wire for positive,
but the white wire always goes to ground.
|
| |
[click to enlarge]
|
As the name implies, deep
cycle batteries can be drained much lower than car batteries before they need recharging. That said, it's
wise to never let battery voltage fall below about 20% or so; that's why we have built-in chargers in our rigs.
| |

|
| ☞ | |
Deep cycle batteries are designed to be run down and then recharged over and over again without
damaging them.
|
| ☞ | |
Get the best deep cycle battery you can afford; you won't be sorry.
|
|
The battery in our rig can deliver 300 watts (12v x 25A) for 140 continuous minutes, giving us about 58 amp-hours,
which is another way of saying 50A for one hour, or 1A for 50 hours.
25A * 140/60 hrs = 25A * 2.33 hrs = 58.33 amp-hrs
As you can see, if you're living off your battery it is critical that you determine what devices and
appliances you really need and run only those, perhaps intermediately.
You can check the current level in a DC or AC circuit with something called a clamp-in amp meter (ammeter). It allows you to
measure current without having to disconnect any wires from the circuit, like you would have to do with a standard
ammeter.
Here is one from Amazon.
| |

|
Here is a rather lengthy tutorial on everything you need to know about batteries:
"Battery Basics: A Layman's Guide to Batteries. If you don't get your battery questions answered here, then
this article will likely do so.
RV Repair Club has a DVD set about
RV batteries. I haven't personally seen it, but if you do
let me know what you think.
Battery types
There are several types of non-specialty vehicle batteries. Each has advantages and disadvantages.
- lead acid
- wet cell
- AGM
- gel cell
- deep cycle
Lead acid batteries have been around for for over a century, and this is the type your are probably familiar
with. It's the kind where you pop off the caps and add distilled water if necessary.
If you look inside the holes you can see the plates and a solution of sulfuric acid and water, called an electrolyte.
An instrument called a hydrometer is used to measure the batteries specific gravity; that is,
the amount of sulfuric acid in the electrolyte. Charging a
lead acid battery causes sulfur to return from the plates back into the electrolyte.
| ☞ | |
Remove all jewelry from your hands and arms and wear safety gogles
when working around a lead acid battery. And don't smoke - hydrogen gas made by the battery is
explosive. You might also want to wear old clothes if you will be working with the fluid.
|
Lead acid batteries come in several versions: flooded (wet) cell, gel cell and absorbed glass mat (AGM).
Some versions even come in sub-versions but that's not relevant for us here. AGM and gel cell batteries don't
tend to degrade as easily as wet cells, but they are much more expensive. AGM batteries also hold their charge
better than other types.
Now that you know a bit about the different types of batteries, the bottom line is: you want a deep cycle
battery. Or more accurately, your RV wants a deep cycle battery.
Series and parallel connections
Multiple batteries can be connected together in two ways. If you connect the positive posts together and the
negative posts together, you effectively double the output amperage, but the total voltage remains the same.
This is called a parallel connection. Connecting two 6v 25A batteries in parallel acts like a
single 6v 50 amp battery.
Connecting the negative post of one battery to the positive post of another battery doubles the voltage but
retains the same current value. Called a series connection, connecting two 6v 25A batteries in series doubles the
voltage to 12v while leaving the current at 25A. When you stack batteries in a flashlight or TV remote, you
are placing them in series.
People familiar with golf carts know that they usually employ six 6v batteries connected in series to produce
a total of 36 volts, or eight 6v batteries to produce 48 volts.
Our pontoon boat uses 4 12v deep cycle batteries connected in series to yield 48 volts, used mainly to drive the electric motor.
Since rigs like fifth-wheels are strictly 12v systems, there is no point in connecting 12v batteries in either series
or parallel. However, you can connect two 6v batteries in series to achieve the 12v total.
Taking along a second battery to use in emergencies while dry camping can be a good idea.
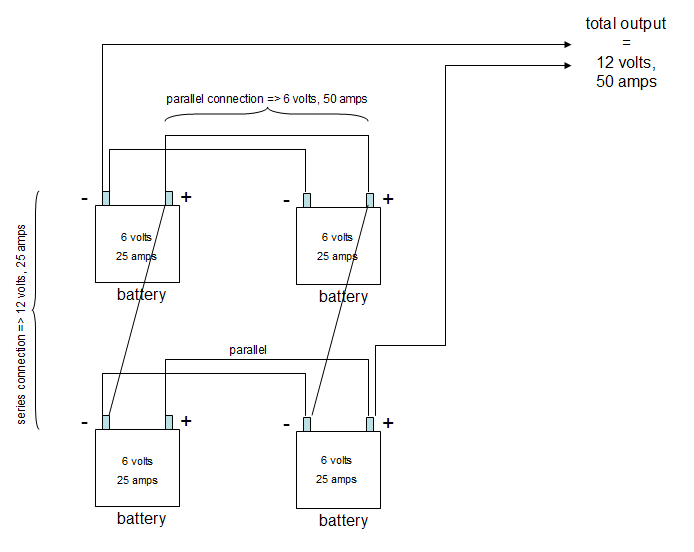
Here is a diagram showing how four 6v 25A batteries can be simultaneously connected in series and parallel to
yield an output of 12v and 50A. The figure is for illustration only and doesn't suggest any particular
application.
|
|
[click to enlarge]
|
If you plan to do a lot of dry camping, look at
this article for a good discussion on converting from a 12v deep cycle battery to two 6v golf cart batteries.
The purpose of doing so is to increase the number of amp-hours the 6v pair can deliver.
12 volt distribution panel (aka fuse panel)
If you open or remove the cover on your AC distribution panel (aka the breaker box)
you will see that it also contains a number
of 12v fuses, probably like the ones in your car. These in-line fuses provide 12v DC
power to things in the list shown at the start of this page. Whenever something like a 12v light stops working, it may just be
a burned out bulb or it could be a burned out fuse. Fuses usually go bad either due to overloads or shorts, something
that causes too much amperage on the circuit. But they can also just die of old age.
12v fuses come in various amperages like 5A, 10A, 15A, 20A or 30A.
| ☞ | |
I always carry several spare fuses for each amperage. If you don't have any you can always get them at places
like an auto parts store or Walmart.
|
One peculiarity of most fifth-wheels is that the fuse for the electric front jacks is not in the
fuse panel box. On our rig it lives in the overhead part of the front storage compartment where the jacks are,
close to the jack's on/off switch.
You can easily find the fuse by tracing the jack's wiring from the battery's positive terminal until you
come to the fuse holder. I also carry several spares for this fuse since I have burnt it out several times
when I put too much strain on the jacks. If you're jacks aren't electric then ignore all this.
|
|
[click to enlarge]
|
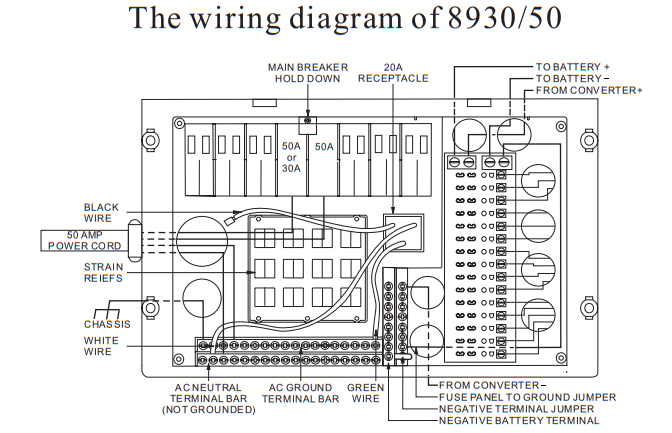
Here is a diagram of the distribution box in our rig.
|
|
[click to enlarge]
|
-- what is my panel receptacle for?
-
Battery disconnect switch
|
You probably have a battery disconnect switch somewhere in your rig; ours is in the basement on the
other side of the wall from the battery.
This switch removes power from the 12v distribution panel, so your 12v lights and most other things won't work while
the switch is off. But your front jacks should work whether the disconnect switch is on or off.
If you have a breakaway switch that controls the automatic breaks, it is probably hardwired directly
to the positive terminal of the battery. It is NOT disabled by turning off the battery disconnect switch.
This is as it should be, since you don't want your emergency braking action disabled, no matter what.
| ☞ | |
Turn off the battery disconnect switch while your rig is in storage. Also turn it off when you take your rig
to an RV repair facility -- no telling how long the rig will sit. When you get your rig back, be sure to
flip it back on if you will be using the rig soon.
|
| ☞ | |
The battery disconnect must be ON while driving in order for the
umbilical cord to help maintain battery charge.
|
| |

|
Charging the battery
Batteries are charged by supplying a 12v connection across the positive and negative terminal posts, but it has to
be done the right way. Modern deep cycle batteries can actually be ruined by slapping on a cheapo charger, like we used
to do with our old jalopy batteries back in the day. Today, so-called "smart" chargers use sophisticated electronics
to monitor various stages of the charging process and adjust voltages accordingly. An unfortunate side-effect
of this smartness is that a depleted DC battery could take up to 24 hours to fully recharge. This is in fact why
you have a 120v to 12v converter in your rig, so it can keep the battery charged while you drain electrons for your
12v lights, slideouts, A/C controls and so on.
Your battery(s) won't provide power for very long under heavy usage, and hence will require occasional charging.
Fortunately there are several ways to do so. First and foremost is the
converter found in all but the smallest rigs. As you will see below, a
converter is used to convert 120v power into 12v. It will likely be plugged
into a 120v socket somewhere, and its output leads connect into the 12v fuse panel. Newer converters (called converter/chargers)
also keep a charge on the battery, while some older ones do not.
Another way some rigs charge batteries is with an
inverter. While an inverter's purpose is to
convert 12v battery DC into 120v AC, some modern versions also accept 120v input and use it to charge batteries.
Converters and inverters (see below) that also have built-in battery chargers
come in two types: dumb and smart. A dumb charger, like a trickle
charger, does nothing but supply 12v current to the battery and lets the battery charge itself.
On the other hand, smart chargers have built-in electronics to monitor the charging process and regulate it accordingly.
Smart chargers have 3- or 4-stage charging controllers. These states, called bulk, absorption, float and equalize, are
discussed here.
| ☞ | |
If you get a battery charger or converter for your rig, make sure it is a"smart" one; that is, it has either a 3 or
4 stage controller.
|
Finally, more and more campers are using solar panels to charge their batteries (see below). This solution can be pricy, but
it does have the advantage that the sun is free! I see that wind powered chargers are also starting to make the
scene.
If all else fails, there is always the old fashioned battery charger, like the one you might use to charge your
car battery. If you get one of these (and you probably should) make sure it is a "smart" charger that has a 3 or 4
stage charging process.
The easiest way to tell if a converter/charger or inverter/charger is charging your battery is to disconnect it
and measure the voltage across the
battery. Then plug in the converter or inverter back in and measure again. You should see an increase in battery
voltage if the device is charging.
Rough numbers: 12.4-12.6v without. 13.5-14.5v plugged in. If you don't own
a voltmeter you can ask a friend or buy one. They cost about $20 at any hardware store or auto parts place.
| ☞ | |
The constant charging from leaving a converter/charger or inverter/charger plugged in all the time
can deplete the electrolyte level in the
battery(s) cells. Check the battery(s) at least monthly and if you use the RV on a regular
basis and/or leave it plugged in when you're not using it you may need to check the battery(s) more often.
|
-- try not to let run down
-- deep cycle
--charger / xfer sw / charger - not good
Solar power
Boondockers should give some consideration to whether the solar option might be
right for them. Solar panels are becoming more and more popular, especially because
sizes and prices continue to fall.
-- picture
-- wind power
120v-to-12v converter
|
At this point, an alert reader might ask "How do boondockers live off the grid on battery only?
Won't their batteries run down rather quickly? If it takes a long time to recharge them then do you
just sit around for hours or days waiting?"
The answer is no. Luckily your rig has a box called a "converter". Ours lives in the basement.
To many this is a mysterious
thingy that they really don't understand, if indeed they even know they have. A converter
is basically a device that takes in 120v input
and converts it to 12v output. The output is connected to your rig's 12v distribution panel, thus providing 12v
power to your lights, etc. But that begs the question "How does the converter run without 120v power?" It doesn't.
That's where your generator comes in. Most dry campers resolve themselves to the need for some form of
generator.
Ours operates on either gas or propane.
-- show link to ours
| | |

|
A good converter can maintain charge on your battery(s) as long as the converter is plugged in to a 120v line.
For many people,
they first become aware that they actually have a converter when their battery unexpectedly runs down,
probably because the converter's cord becomes unplugged from its 120v receptacle due to vibration.
-- how is converter wired into our rig? okay to plug into any receptacle?
-- converter must supply 25A?
Breakaway switch
|
Fifth-wheels and some other heavy trailers have what's called a breakaway switch. It's purpose is to activate
the trailer's brakes
in case it unexpectedly comes loose from the tow vehicle. It works by attaching the looped end
(called a lanyard) of a cable somewhere onto your
tow vehicle. The other end of the cable is permanently hooked up to a switch, probably located on the front of the
trailer close to the king pin.
If your trailer comes loose from its tow, the cable will yank out from the switch and cause the trailer's brakes
to be electrically activated, thus stopping the trailer and preventing it from running amok.
Where to attach the loop? I attach mine to the arm on my fifth-wheel hitch. The arm has a safety clip that keeps
it from rotating, and that clip turns out to be a very convenient place to attach the cable loop.
| |

|
| ☞ | |
If you think there is a possibility that your hitch could come loose from the truck bed, then don't hook the
breakaway switch to it. Rather, find some other place where it's sure to stay put no matter what.
|
| ☞ | |
Never, ever take your rig on the road without making sure the breakaway cord is firmly attached to your tow vehicle.
|
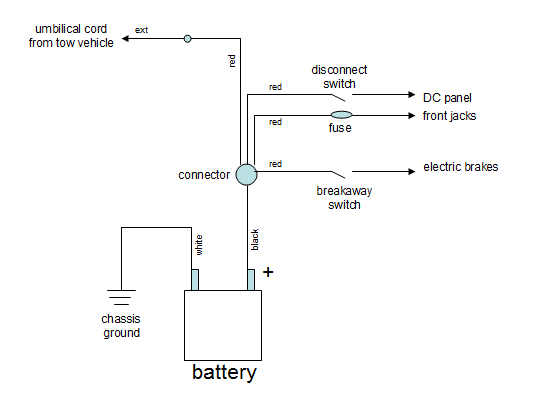
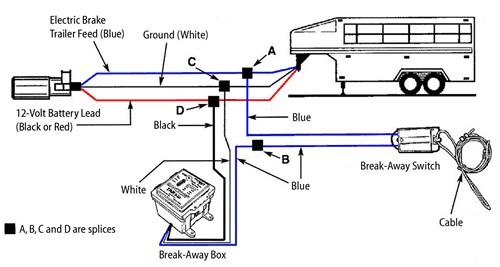
Your breakaway switch is likely wired directly to the positive terminal of the house battery. If you've ever
wondered what that other line is going from your battery's positive post, this is probably it. The negative
line of the switch is connected to the rig's frame (ground).
|
|
[click to enlarge]
|
| ☞ | |
As the above diagram shows, your breakaway switch is probably wired up to your house battery,
rather than to the vehicle battery through the u/c connection. This is by design since if the trailer
comes disconnected from your truck then the u/c will also disconnect. All this means that
you must have sufficient charge in the house battery to power the brakes in an emergency.
A run-down battery will not be able
to supply the juice needed to do emergency stops. So get in the habit of
checking the house battery charge before you set out anywhere with your trailer.
|
For those who might be wondering why the breakaway switch is connected to the house battery and not
to the umbilical cord, think about that for a second. If your trailer comes loose from the tow vehicle and
activates the breakaway switch then the u/c will likely be broken loose also. This would likewise break the
connection with the tow vehicle's battery and the emergency brakes wouldn't be able to activate.
If your rig doesn't have breakaway capability,
here is
a great article on the eTrailer site for how to install one.
BTW, I unashamedly took the diagram above from that article. Thanks, eTrailer.
-- how to test..
Battery maintenance
You should regularly check your battery's water level, assuming it is not a sealed system. If the
battery does need water, be sure to use distilled water. It can be found at places like Home Depot,
Lowes, grocery stores or auto stores. DO NOT use tap water, as particulate matter in the water
will damage the battery cells. Also make sure that the battery is fully charged before you set out,
especially if it has been sitting idle for awhile.
Battery maintenance is easy to do and offers a lot of reward for minimal effort. You probably already
know how to check your car battery - the process is the same for your RV battery. If it isn't a sealed battery,
open the caps and check the fluid; add distilled water if necessary but don't overfill. Tighten the connections.
Check for corrosion around the post and,
if present, clean with a stiff wire brush using a baking soda and water solution. Corrosion is especially prevalent
when driving on salted roads.
Corrosion can be slowed down or prevented by spreading a little electrical grease on the battery terminals.
It's best to do before connecting the cables to the battery posts, but if you don't have time just spread
a little around the posts and connectors.
Here are some greases
on Amazon. We use
Ultra-Seal.

|
|
[click to enlarge]
|
If you have a voltmeter ensure that the voltage between terminals
(with one terminal disconnected) is at least a full 12v. Note that most fully-charged batteries may read higher,
something like 12.7v.
If you go dry camping, you might want to consider taking along a second 12v battery. But
always keep in mind the weight tradeoff.
| ☞ | |
Disconnect the battery's ground cable whenever you do any kind of work on your rig's 12v electrical system.
|
| ☞ | |
Also disconnect the battery whenever you store your rig.
|
You should check your battery before going on a trip so you won't encounter any unfortunate
surprises when you get to your destination. You should also carry a good battery checker and battery
charger with you when you travel.
Unfortunately we have not yet reached the level of civilization where the expiration date on a battery is
easy to determine. If you're lucky, the date will be printed on a label on top of thin bas relief
somewhere along the top
rim of the battery. Sometimes info is printed on a label but it can be hard to decipher; it can be manufacture
date, date shipped to the dealer, date recharged, or somebody's wedding anniversary.
Here's a video on
YouTube showing what kind of a mess things are. Your best bet is probably to have the person you buy the
battery from tell you the date and show you how to read it on the battery. Finally, make sure you get a receipt
or warranty paper with the info written on it. Check the expiration date before you head out on a trip.
For even more info, read this extremely good article from BatteryStuff.com for a
detailed discussion of all things battery.
12v system problems
Even with judicious maintenance, problems can occur with your 12v system. The 12v lights can
unexpectedly start dimming or going out completely.
The first thing I check is to make sure the converter box is still plugged into its 120v
source. Sometimes bumpy rides can shake the cord out of its socket. If the converter is still
plugged in, it may have gone bad. This has happened to me because of a lightening strike.
Converter boxes also do go bad all on their own; sometimes they just succumb to old age.
Problems can also occur because of the battery itself. Perhaps it needs charging, which is why you should
carry a portable battery tester and charger. Perhaps it needs distilled water; do you carry any with you? As mentioned
earlier, don't be tempted to use plain drinking water; go get distilled water.
Perhaps the battery has actually gone bad. Batteries have finite life expectancies, which is why you
should carry a battery checker.
Batteries can suddenly cease to function due to bad connections, either at the battery posts or
somewhere down the line. Driving on rough roads can jar things loose, so if your 12v isn't working after a
trip down a particularly bumpy road, this is something you should suspect.
Should you find yourself in the unenviable position of not being able to lower your front jacks because
you have no 12v, you can always jump from your vehicle battery. This is one reason I carry long jumper
cables with me. Your jacks may have a manual crank option; mine don't.
Batteries can be damaged due to heavy current surges or lightening strikes. The only solution here is to replace
it. I've found Walmart to be a good source for reasonably priced deep cycle batteries. But if it makes you feel
better you can always get one from an RV dealer. In any case, be sure to take the old one with you so you can
get a refund on the old carcass.