Most RVs have two different types of electrical systems: 12 volt and 120 volt. 12v systems is supplied
by the battery(s) contained in your rig. 120v are supplied by
so-called "land line" or "shore" hookups, the type you find at any full service campground. The
term shore power comes from the boating world, where boaters tie up to a dock or pier and plug into
hookup boxes. Interestingly, the plugs and receptacles used for boats are pretty much the same as we RV-ers use.
These discussions first cover some background material on RV electrical systems. Then we go into
various maintenance routines to keep your rig's electrical system humming. Finally, we provide some
suggestions regarding what to do when inevitable electrical problems crop up.
You will see references to the terms "male" and "female"
when referring to the ends of electrical cords, adapters, plugs and receptacles. The female end of
a receptacle or connector has holes in it, much like the 120v outlets in your home.
Male plugs and connectors have pins sticking outward.
Female connectors are designed to prevent shock by touching them,
which serves as protection from kids, drunks and idiots. Imagine what would happen if
the reverse were true - if live receptacles had pins sticking outward rather than inward. Luckily, sanity
prevails so male pins do not have current running through them. Current flows when a male plug is
inserted into a female receptacle.
To recap, all lines that have live current have female connectors on the open end.
Male connectors are designed to plug into female connectors. This chain can be theoretically extended
indefinitely, although it's not a good idea in practice due to the increase in wire resistance with each
extension added.
To help you follow along, here is a diagram of the electrical system in our fifth-wheel.
Your's may be different, so I encourage you to look for appropriate
diagrams on the 'net. Click on the diagram to enlarge it, or
click here to see it in a separate window.

|
|
[click to enlarge]
|
If you're into gore, here's a rather sophisticated
example diagram of a motorhome with a generator, converter, inverter,
multiple batteries and solar panels.
Wire gauges
If you plan to do any wiring in your rig, it is imperitive that you understand about wire sizes, referred to as
wire "gauges". Any wire has a property called "resistance", which simply means that as current flows through a wire
it heats up. For a given current, the smaller the wire's diameter the more heat it will give off. Consider the old
style incandescent light bulb. The filiment inside is a very thin wire which gives off light as current runs through
it. It also gives off heat, as anyone knows who has tried to grab a 100 watt bulb after it's been on for awhile.
For us, the problem is that as a wire gets hotter and hotter it can actually burst into flame. As you might imagine,
this wouldn't be good for your rig! This is why choosing the proper wire gauge for your application is important.
Always look up recommended wire sizes before you install any equipment in your rig. Again, the internet is your friend.
Here is a chart from
Solaris Technology Industry, Inc of
wire gauges needed for different current levels (in amps). Unless you're an electrician, the only two columns you
would be interested in are the ones for wire guage and amps. Clck on the diagram below to view a readable version.

|
|
[click to enlarge]
|
| ☞ | |
Contrary to intuition, wire gauge numbers get smaller the thicker the wire; that is,
increasing gauge numbers denote decreasing wire diameters. So gauge is essentially a measure of a wire's
cross-section. Curiously, the original meaning of
gauge referred to the number of times a wire had to be drawn through the forming apparatus to achieve the
desired thickness. 30 gauge wire had to make more passes through the drawing dies than an 8 gauge wire.
The cross-sectional area of each gauge is an important factor for determining its current-carrying capacity
(its "ampacity"). That's why having the proper gauge wire is critical for any wiring project.
The American Wire Gauge (AWG) tables below are for a single, solid, round conductor.
The AWG table below is for a single, solid, round conductor. The AWG of a stranded wire is determined by the
cross-sectional area of an equivalent solid conductor. Because there are small gaps between the strands,
a stranded wire will always have a slightly larger overall diameter than a solid wire with the same AWG.
You will see the term "heavy gauge" wire. Again, contrary to
intuition, the heavier the gauge, the lower the gauge number. Hence, an 8-gauge wire is "heavier" than a 10-gauge wire.
The term "heaviness" refers to the amount of current it can conduct without overheating.
| |

|
The table applies to both AC and DC currents.
Most of the gauges you would be working with run from #7 thru #21. You can always use a thicker wire
(lower AWG gauge nr) than shown as long as the wire fits into its connection. Keep the following rule in mind:
the higher the amperage flowing through the wire, or the longer the wire, the thicker the wire needs to be.
Be aware that braided wires can carry more amperage than solid wires.
Standard jumper cables usually have a 6-gauge rating.
There is actually another wire gauge standard, the Society of Automotive Engineering (SAE).
See here for comparisons
between that and the AWG standard. When you purchase wire you should know the difference between the two.
If you want to determine any of the wire gauges in your rig, here is a wire gauge
measurement tool available at Amazon. One good thing about it is that you don't have to disconnect a wire
from a circuit to use it. And it's cheap. But in order to get an accurate gauge measurement with any tool, it's best to
strip off insulation and measure the bare wire, but make sure you turn off the current first!
12 volt systems
First, let's talk about 12 volt systems. You may be surprised to hear that your 12 volt system is much more
important to your rig's sense of well-being than the 120 volt system, but it is. You can camp without access to 120v,
as dry campers and boondockers can attest. You can live without A/C or TV. Your fridge can run on propane.
You can cook with propane. You can heat water with propane. But you'll have a hard time getting along without 12v,
with which you can at least
have ceiling lights, your slideouts will work, and you can ignite the burners on your propane stove, fridge or
water heater.
When discussing RV batteries you often see the terms "vehicle battery" and "house battery". A vehicle
battery is the one in either your tow vehicle or, if you have a motorhome, the one used to start the motor.
The vehicle battery also supplies juice through your umbilical cord (see below) for things like your brake
lights and turn signals while you are driving.
A house battery is the one your rig lives on while you're camping. It supplies the voltage for your interior
lights, slideouts, jacks and so on.
The following items all depend on having 12v access to your in-rig (house) battery(s).
The length of the list may surprise you.
- 12v lights: ceiling, basement, exterior
- Front jacks
- Rear stabilizers
- Slideout motors
- Fresh water pump
- Smoke, CO and propane leak detectors
- Awnings
- Refrigerator control
- Air conditioner controls
- Furnace control
- 12v propane igniters
- Stove hood fan
- Ceiling vents and fans in kitchen and bath
When you think about it, all of the items in the above lists are necessary
if you go dry camping (aka boondocking) where you might not be able to connect to a 120v source.
The following items are supplied by your tow vehicle's umbilical cord rather than the rig's house battery.
- Brake lights, backup lights, side lights, turn signals
- Brake control
- Emergency trailer brakes (breakaway cord)
See below for a detailed discussion of the umbilical cord.
Here is
a diagram showing how a typical fifth-wheel 12v system is distributed throughout
your truck and trailer.
Batteries
|
Your RV needs a good quality RV or marine battery. Do not attempt to get away with a cheaper
car-type battery - it won't work! Unlike car batteries, deep cycle batteries are designed to be regularly
depleted and then recharged. This is exactly what you need, for example, if you go
dry camping where you may run the battery down and then recharge it again and again,
possibly by a generator.
Be aware that a deep cycle battery takes a long time to re-charge, quite a bit longer
than a car battery. In fact, it make take up to 24 hours to fully charge.
| ☞ | |
On most rig batteries, a white wire runs between the negative battery post and the frame, and another white wire
runs to the negative terminal of the 12v fuse panel. A black
wire is connected to the positive battery post and runs to the positive terminal of the
12v fuse panel (see '12 volt distribution panel' below).
This is similar to normal house wiring where white is neutral and black is hot.
On some rigs there may be a red wire rather than a black wire for positive,
but the white wire always goes to ground.
|

| |
[click to enlarge]
|
As the name implies, deep
cycle batteries can be drained much lower than car batteries before they need recharging. That said, it's
wise to never let battery voltage fall below about 20% or so; that's why we have built-in chargers in our rigs.
| |

|
RVs require deep cycle batteries; regular passenger vehicle batteries just won't do.
Car batteries are designed to supply large cranking current, and thus have what is called high "cranking amps."
This is simply not a requirement for RVs since they won't be cranking anything. But note that motorhomes do,
and have separate batteries of their own called vehicle batteries.
Vehicle batteries depend on a vehicle's alternator
to constantly recharge them.
| ☞ | |
Deep cycle batteries are designed to be run down and then recharged over and over again without
damaging them.
|
| ☞ | |
Get the best deep cycle battery you can afford; you won't be sorry.
|
|
The battery in our rig can deliver 300 watts (12v x 25A) for 140 continuous minutes, giving us about 58 amp-hours,
which is another way of saying 50A for one hour, or 1A for 50 hours.
5A * 140/60 hrs = 25A * 2.33 hrs = 58.33 amp-hrs
As you can see, if you're living off your battery it is critical that you determine what devices and
appliances you really need and run only those, perhaps intermediately.
You can check the current level in a DC or AC circuit with something called a clamp-in amp meter. It allows you to
measure current without having to disconnect any wires from the circuit, like you would have to do with a standard
ammeter.
Here is one from Amazon.
| |

|
Here is a rather lengthy tutorial on everything you need to know about batteries:
"Battery Basics: A Layman's Guide to Batteries. If you don't get your battery questions answered here, then
this article will likely do so.
Battery types
There are several types of non-specialty vehicle batteries. Each has advantages and disadvantages.
- lead acid
- wet cell
- AGM
- gel cell
- deep cycle
Lead acid batteries have been around for for over a century, and this is the type your are probably familiar
with. It's the kind where you pop off the caps and add distilled water if necessary.
If you look inside the holes you can see the plates and a solution of sulfuric acid and water, called an electrolyte.
An instrument called a hydrometer is used to measure the batteries specific gravity; that is,
the amount of sulfuric acid in the electrolyte. Charging a
lead acid battery causes sulfur to return from the plates back into the electrolyte.
| ☞ | |
Remove all jewelry from your hands and arms and wear safety gogles
when working around a lead acid battery. And don't smoke - hydrogen gas made by the battery is
explosive. You might also want to wear old clothes if you will be working with the fluid.
|
Lead acid batteries come in several versions: flooded (wet) cell, gel cell and absorbed glass mat (AGM).
some versions even come in sub-versions but that's not relevant for us here. AGM and gel cell batteries don't
tend to degrade as easily as wet cells, but they are much more expensive. AGM batteries also hold their charge
better than other types.
-- deep cycle
Now that you know a bit about the different types of batteries, the bottom line is: you want a deep cycle
battery. Or more accurately, your RV wants a deep cycle battery.
Do not attempt to get away with a cheaper car-type battery - it won't work! Deep cycle batteries are designed to
be regularly depleted and then recharged. This is exactly what you need, for example, if you go dry camping where
you may run the battery down and then recharge it again, maybe by a generator.
Be aware that a deep cycle battery takes a long time to re-charge, quite a bit longer than a car battery.
In fact, it make take up to 24 hours to fully charge.
Unlike deep cycle batteries, car batteries are built to crank engines and thus have high what is called
"cranking amps." This is not a requirement for RVs, except for a motorhome's engine battery of course.
Vehicle batteries depend on an alternator to constantly recharge them.
Series and parallel connections
Multiple batteries can be connected together in two ways. If you connect the positive posts together and the
negative posts together, you effectively double the output amperage, but the total voltage remains the same.
This is called a parallel connection. Connecting two 6v 25A batteries in parallel acts like a
single 6v 50 amp battery.
Connecting the negative post of one battery to the positive post of another battery doubles the voltage but
retains the same current value. Called a series connection, connecting two 6v 25A batteries in series doubles the
voltage to 12v while leaving the current at 25A. When you stack batteries in a flashlight or TV remote, you
are placing them in series.
People familiar with golf carts know that they usually employ six 6v batteries connected in series to produce
a total of 36 volts, or eight 6v batteries to produce 48 volts.
Our pontoon boat uses 4 12v deep cycle batteries to yield 48 volts, used mainly to drive the electric motor.
Since rigs like fifth-wheels are 12v systems, there is no point in connecting 12v batteries in either series
or parallel. However, taking along a second battery to use in emergencies while dry camping can be a good idea.
Here is a diagram showing how four 6v 25A batteries can be simultaneously connected in series and parallel to
yield an output of 12v and 50A. The figure is for illustration only and doesn't suggest any particular
application.

|
|
[click to enlarge]
|
If you plan to do a lot of dry camping, look at
this article for a good discussion on converting from a 12v deep cycle battery to two 6v golf cart batteries.
The purpose of doing so is to increase the number of amp-hours the 6v pair can deliver.
12 volt distribution panel (aka fuse panel)
If you open or remove the cover on your A/C distribution panel you will see that it also contains a number
of 12v fuses, probably like the ones in your car. These in-line fuses provide 12v DC
power to things in the above list. Whenever something like a 12v light stops working, it may just be
a burned out bulb or it could be a burned out fuse. Fuses go bad either due to overloads or shorts, something
that causes too much amperage on the circuit. 12v fuses come in various amperages like 5A, 10A, 15A, 20A or 30A.
| ☞ | |
I always carry several spare fuses for each amperage. If you don't have any you can always get them at places
like an auto parts store or Walmart.
|
Be aware that if you have jacks, there will likely be yet another fuse in the circuit somewhere. It seems like on
most rigs the fuse is located close to the jack's on/off switch.
Here is a picture of a typical 12v system. Note that in most rigs the AC and DC panels
occupy the same box. Some rigs also have the converter within the same enclosure.

|
|
[click to enlarge]
|
Here is a diagram of the distribution box in our rig.

|
|
[click to enlarge]
|
Battery disconnect switch
|
You probably have a battery disconnect switch somewhere in your rig; ours is in the basement close to the battery.
This switch removes power from the 12v distribution panel, so your 12v lights and most other things won't work while
the switch is off.
If you have a breakaway switch that controls the automatic breaks, it is probably hardwired directly
to the positive terminal of the battery. It is NOT disabled by turning off the battery disconnect switch.
This is as it should be, since you don't want your emergency braking action disabled, no matter what.
| ☞ | |
Turn off the battery disconnect switch while your rig is in storage. Also turn it off when you take your rig
to an RV repair facility -- no telling how long the rig will sit. When you get your rig back, be sure to
flip it back on if you will be using the rig soon.
|
| ☞ | |
The battery disconnect must be ON while driving in order for the umbilical cord to charge the battery.
|
| |

|
Charging the battery
Batteries are charged by supplying a 12v connection across the positive and negative terminal posts, but it has to
be done the right way. Modern deep cycle batteries cn actually be ruined by slapping on a cheapo charger, like we used
to do with our old jalopy batteries back in the day. Today, so-called "smart" chargers use sophisticated electronics
to monitor various stages of the charging process and adjust voltages accordingly. An unfortunate side-effect
of this smartness is that a depleted DC battery could take up to 24 hours to fully recharge. This is in fact why
you have a 120v to 12v converter in your rig, so it can keep the battery charged while you drain electrons for your
12v lights, slideouts, A/C controls and so on.
Your battery(s) won't provide power for very long under heavy usage, and hence will require occasional charging.
Fortunately there are several ways to do so. First and foremost is the converter found in all but the
smallest rigs. As you will see below, a converter is used to convert 120v power into 12v. It will likely be plugged
into a 120v socket somewhere, and its output leads feed into the 12v fuse panel. Newer converters (called converter/chargers)
also keep a charge on the battery, while some old ones do not.
Another way some rigs charge batteries is with an inverter (discussed below). While an inverter's purpose is to
convert 12v battery DC into 120v AC, some modern versions also accept 120v input and use it to charge batteries.
Converters and inverters (see below) come in two types: dumb and smart. A dumb charger, like a trickle
charger, does nothing but supply 12v current to the battery and lets the battery charge itself.
On the other hand, smart chargers have built-in electronics to monitor the charging process and regulate it accordingly.
Smart chargers have 3- or 4-stage charging controllers. These states, called bulk, absorption, float and equalize, are
discussed here.
| ☞ | |
If you get a battery chargers or converter for your rig, make sure it is a smart one; that is, it has either a 3 or
4 stage controller.
|
Finally, more and more campers are using solar panels to charge their batteries (see below). This solution can be pricy, but
it does have the advantage that the sun is free! I see that wind powered chargers are also starting to make the
scene.
If all else fails, there is always the old fashioned battery charger, like the one you might use to charge your
car battery. If you get one of these (and you probably should) make sure it is a "smart" charger that has a 3 or 4
stage charging process.
120v-to-12v converter
|
At this point, an alert reader might ask "How do boondockers live off the grid on battery only?
Won't their batteries run down rather quickly? If it takes a long time to recharge them then do you
just sit around for hours or days waiting?"
The answer is no. Luckily your rig has a box called a "converter". Ours lives in the basement.
To many this is a mysterious
thingy that they really don't understand, if indeed they even know they have one. A converter
is basically a device that takes in 120v input
and converts it to 12v output. The output is connected to your rig's 12v distribution panel, thus providing 12v
power to your lights, etc. But that begs the question "How does the converter run without 120v power?"
Well, that's where your generator comes in. Most dry campers resolve themselves to the need for some form of
generator. Ours operates on either gas or propane.
-- show link to ours
| | |

|
A good converter can maintain charge on your battery(s), at least as long as the converter is plugged in to a 120v line.
For many people,
they first become aware that they actually have a converter when their battery unexpectedly runs down,
probably because the converter's cord becomes unplugged from its 120v receptacle due to vibration.
If your controller has a built-in battery charger, make sure it is a "smart" one (see above).
Umbilical cord
|
For fifth-wheels and other types of tow trailers, 12v power is supplied to your rig while on
the road via what is called an umbilical cord. The cord plugs into the
truck's female receptacle on one end. The other end is fans out to various exterior lights (stop, brake, turn) and
also supplies power to your emergency brake control, if you have one.
|
|

|
| ☞ | |
You won't be able to pull your trailer at night without an umbilical cord, since that's what
powers the external lights on your rig. And even worse, you won't be able to control the
automatic brakes on a big rig without one.
|
| ☞ | |
Occasionally remove the cover from the umbilical cord box and check the connections. Bumpy roads can shake
the wire nuts loose from the wires, yielding separated connections. This happened to us on the rough roads
of Canada; I was lucky to find it or some bad things could have happened!
|
Umbilical cords come in 4-way, 5-way, 6-way and 7-way configurations. The "way-ness" refers to the number of wires.
You'll also see a 7-way called a 7-pole, 7-pin, 7-blade or 7-wire connector.
Here is an image showing the various types.

|
|
[click to enlarge]
|
The umbilical cord on our fifth-wheel is a 7-way.
Here is what the 7-way wiring looks like on our rig.

| |
[click to enlarge]
|
| |

| |
[click to enlarge]
|
|
Also see here
for more info on 7-way umbilical cords.
If you have a 4-way connector then there won't be a lead to help keep your battery charged
while driving. If you are on the handy side, you can wire your 4-way
to maintain battery power.
See here.
Here is a diagram of how 7-way might be distributed through your rig.

|
|
[click to enlarge]
|
| ☞ | |
There are no standard wire colors; it's completely up to the manufacturer of the cord and
receptacle.
It also depends very much on how your friendly mechanic wired it up to the
various lights and thingys on your truck.
I have found almost every possible variation of wire colors on the 'net, and my particular
wiring doesn't conform to any of them.
So be aware that your wiring may be different than whatever you find on the 'net.
Bottom line is that if you have to redo your wiring,
do it by logical function (see the technique below) and don't depend on any particular color scheme.
|
| ☞ | |
I would advise that you remove the cover from the cord box and write down how the various colored wires
are connected. This could prove invaluable should you have connection problems on the road, like ripping
the umbilical cord out of the box! Keep your wiring diagram in your rig.
|
It is crucial that your umbilical cord is functioning properly, for a couple reasons. First, power to your
rig's exterior brake lights and turn signals is supplied by the cord. Secondly and most importantly,
your rig's brake system gets its juice from the cord. No 12v, no stopping! It is very important that you check
out the exterior lights after you hook up but before you take off. It is convenient to have someone stand
in the rear and let you know if everything is working, but you can easily walk back and forth to check it out yourself.
Your in-cab brake control system will likely let you know if the connection is faulty. Mine doesn't show any
numbers on the display unless the umbilical cord is correctly connected. This might also be a good opportunity to
set the control's pressure value to an open road setting.
| ☞ | |
After you connect your umbilical cord and before you head out, pull the rig for a few hundred yards and then tap
on the brakes. See if the trailer's automatic braking is to your expectatiion. If it is jerky then you need to
back your in-cab controller off a bit. If it's sluggish then move it up. You don't want to be annoyed by poor
braking while on the road.
|
Should you find yourself in the embarassing position of having pulled away from the trailer with the unbilical
cord still attached, you may be able to rewire it. Here is a
Youtube video that shows you how.
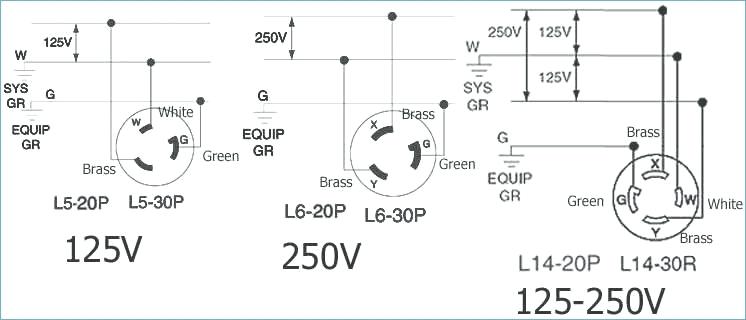
The diagrams below show two different wiring standards for 7-way plugs. The one on the left is used for RVs like
fifth-wheels. Umbilical cord and socket manufacturers adhere to the RV standard for pin position and wire colors.
Although pin numbers are shown in the diagrams, I do not believe that they are standard. Rather, people like
myself prefer to refer to a pin's position relative to the face of a clock. For example, in both diagrams the
white ground wire is at the 7 o'clock position while the black 12v wire is at 1 o'clock. This terminology
is referred to as "clocking".

| |
[click to enlarge]
|
| |

| |
[click to enlarge]
|
|

| |
It's important that you know how your umbilical cord is wired up to your trailer. You can probably go for quite
a while without this knowledge, but eventually something's going to break. What would you do if you accidently
pulled away from the rig without first unplugging the u/c? Now you have a mess. You probably think you can just
join all the wires together, red to red, blue to blue, etc. Well, if your rig's anything like mine I can almost
guarantee that the colors won't match up. So here we're going to prepare you for any u/c eventuality. After we're done
you will know where all the external rig wiring goes and how they are connected to the u/c.
Before you begin, I recommend you make a drawing of your truck's 7-way receptacle, like the one
shown above. It will likely be mounted
on the rear bumper or inside the truck bed. On this drawing you will be showing the seven
pins and the function of each. You don't have to number them. As you detect what each pin is used for,
make a note. Keep the drawing with you in your rig.
First, let's find out what each pin on your u/c outlet does and also verify that the outlet obeys the
RV standard shown above. If not, it may be SAE standard wiring, in which case the colors red and yellow will be
swapped, as will green and brown.
You'll need a multimeter, one which has at least a voltmeter and ohmmeter. A cheap one will do fine.
| | 
|
Turn off the truck ignition and unplug the u/c.
First, let's see which pin is ground. You might logically think it would be the center pin, but it probably isn't.
For sockets obeying the RV standard it will be the white wire at the 7:00 o'clock position.
Since the ground wire is connected to the frame of the truck,
there won't be any current flowing between the chassis and the ground wire.
So we're going to use the ohmmeter part of the multimeter. An ohmmeter measures the resistance in a wire,
in ohms (who would have guessed?). When you touch the two meter leads together you will see the readout drop
to zero, indicating a lack of resistance. When you touch one lead to the chassis and the other to the ground
wire you should see the same thing, except maybe it won't go all the way to zero since the metal chassis does
have some resistance, as does any metal.
If you find that the pin at the 7 o'clock socket position is in fact ground, then great. Otherwise something
is amiss. Either the wire is broken or disconnected from the chassis, or ground is found on some other pin.
Use your ohmmeter to check the other six pins to see which one is actually the ground. If you find it,
make a note of the proper pin on your diagram.
A human interest story: When I did this it turned out my ground wire wasn't grounded at all
☹. It had shook loose on some very bumpy roads in Canada.
Having a ground connection is critical for your u/c to function, so how did my u/c make a ground connection
without the white wire connected?
Apparently the whole grounding thing depended on
the frame of my trailer resting on the fifth-wheel hitch to establish a mechanical ground connection
between truck and trailer. That's scary! Guess God's been looking out for this old redneck boy after all.
Ok, back to work. Now that you've found the ground wire, let's use the voltmeter portion of the multimeter
to verify the other pins. First, put the red (+) lead on the 1 o'clock pin and the black (-) lead on the
ground pin. This is the "hot" lead so you should be getting a reading of 12v or so. If not, then you need to
go searching the other pins for it. When you've found it, write the pin position on your diagram.
The hot lead is sometimes referred to as the "ext" lead. It is used to supply juice to your rig's external lights,
like the turn signals, stop lights, flashers and running lights. It also maintains a charge on your house
battery while driving.
Now that you've isolated the ground and hot wires, turn on the ignition and turn on the left turn signal.
Use the voltmeter to determine which of the socket pins is fed by the turn signal. It should be the pin at
the 9 o'clock position.
Put the voltmeter's black lead to ground and verify that this is indeed the correct pin.
Since the turn signal blinks on and off, the needle on the voltmeter will move back and forth
accordingly, so leave the lead touching each pin for a few seconds.
If this isn't the right pin, keep moving the red lead to different pins until
you get a reading. When you find the correct pin, make a note of it on your diagram.
Do the same procedure for right turn signal (3 o'clock) and tail lights (11 o'clock). Note that the pins for the
left and right turn signals should also control the emergency flashers.
To find the wire that controls the brake lights (probably at 5 o'clock)
you'll have to have someone push on the truck brake pedal while you
visit the remaining wires.
This wire probably also controls the automatic brakes on your rig.
If your hookup is like mine, there will be no backup lights connection (center pin, yellow wire).
If not, it is possible to repurpose
this wire for other uses, if desired; something like a rear camera comes to mind.
-- https://www.rvupgradestore.com/Choosing-the-right-connectors-for-your-trailer-wiring-a/330.htm
-- https://www.etrailer.com/Trailer-Breakaway-Kit/Tekonsha/2028.html
-- https://www.etrailer.com/faq-wiring.aspx
Ok, congratulations. You now know what each of the seven pins in your 7-way does, and you've made a diagram
for future reference. The next step is to
match each pin on the plug with its associated colored wire at the other end.
With the u/c unplugged from the truck, use your ammeter to find these associations. Put one lead of the meter
onto one of the plug pins and then put the other lead to each colored wire until you get a zero (or low)
reading. Write down the pin-color match on your diagram. Do this for all seven pins. Note: when measuring
resistances it doesn't matter which lead you place where, as there is no current flow.
Note that pin positions are the mirror image for plug and socket. For example, the socket pin at 9 o'clock corresponds
to the pin at 3 o'clock on the plug (looking directly at the plug). Likewise, socket position 5 o'clock is plug
position 7 o'clcok.
Once you have determined the color codes for all functions, plug the umbilical cord back into the truck socket
and repeat
the above procedure, this time testing the voltages on each of the wires at the end of the umbilical cord.
This serves as a sanity check to ensure you have the correct designations from the truck socket all the way back
to the colored wires at the end of the u/c. Your diagram is almost complete.
The colored wires at the end of the u/c
probably collect inside a protective metal box. Open up the box and find the ground (white) wire. You might have
to run a wire from the truck's frame to make testing within reach. From then on
it should be easy to determine the other wires purposes, by testing for voltages between the wires and the
ground wire.
The final step in completing your diagram is to make a note of the wire colors leading from the u/c back to the rig.
Unlike the u/c these colors aren't likely to conform to any standard.
Don't forget to put the cover back on the box when done.
When you're done with the above procedure you will have a nice handy-dandy wiring diagram of your rig's exterior
lights and brakes, along with which u/c wire and pin services each.
BTW If your u/c wiring color codes doesn't match either of the standards show earlier, don't panic. It must
means that some bozo wired it wrong, but as long as the lights and brakes function correctly then you're good.
This is why you make diagrams!.
Here is how our particular fifth-wheel is wired. It took hours of chasing down wires, sometimes on my
back, but I got it figured out. The internal wiring in your rig may have different color coded wires,
but the overall layout should be basically the same.

| |
[click to enlarge]
|
Notice in the above diagram that the breakaway switch power is provided by the black (12v) lead of the
umbilical cord rather than the house battery. This ensures that the emergency breaks will be activated regardless of
whether or not the house battery has charge. So if the pin should be yanked out of the breakaway switch,
power will flow through the black lead to the black/orange lead, through the breakaway box
to the light blue lead and then on to the black lines leading to the breaks.
Here is the RV standard information presented in a tabular form

| |
[click to enlarge]
|
|
I carry a replacement umbilical cord and receptacle with me, one because they are relatively cheap,
and two because yanking one out of the
truck or trailer may cause more damage than can be repaired.
Here is the cord we have, and
here is a corresponding truck receptacle. Make sure whatever you order matches your rig.
Contrary to popular legend, the standard 7-way wiring connecting your trailer to the tow vehicle does not
provide sufficient current to charge the house battery.
The black (ext) wire on the 7-way connects to the positive post of the rig's battery, and essentially connects
the vehicle and house batteries in parallel, sort of like how jumper
cables work. So you might think that recharging of the house batter would occur but it doesn't. The current
flowing through this circuit is not much, primarily because the ext wire is of small gauge.
All this really does is give the battery a little assist. It isn't
enough to actually charge the battery.
Breakaway switch
|
Fifth-wheels and some other heavy rigs have what's called a breakaway switch. It's purpose is to activate the trailer's brakes
in case the trailer unexpectedly comes loose from the tow vehicle. It works by attaching the looped end
(called a lanyard) of the cable somewhere onto your
tow vehicle. The other end of the cable is permanently hooked up to a switch inside your rig.
If your trailer comes loose from its tow, the cable will yank out from the switch and cause the trailer's brakes
to be electrically activated, thus stopping the trailer and preventing it from running amok.
Where to attach the loop? I attach mine to the arm on my fifth-wheel hitch. The arm has a safety clip that keeps
it from rotating, and that clip turns out to be a very convenient place to attach the cable loop.
| |

|
| ☞ | |
If you think there is a possibility that your hitch could come loose from the truckbed, then don't hook the
breakaway switch to it. Rather, find some other place where it's sure to stay put no matter what.
|
| ☞ | |
Never, ever take your rig on the road without making sure the breakaway cord is firmly attached to your tow vehicle.
|
Your breakaway switch is likely wired directly to the positive terminal of the house battery. If you've ever
wondered what that other line is going from your battery's positive post, this is probably it. The negative
line of the switch is connected to the rig's frame (ground).

|
|
[click to enlarge]
|
If your rig doesn't have breakaway capability,
here is
a great article on the eTrailer site for how to install one.
BTW, I unashamedly took the diagram above from that article. Thanks, eTrailer.
Battery maintenance
You should regularly check your battery's water level, assuming it is not a sealed system. If the
battery does need water, be sure to use distilled water. It can be found at places like Home Depot,
Lowes, grocery stores or auto stores. DO NOT use tap water, as particulate matter in the water
will damage the battery cells. Also make sure that the battery is fully charge before you set out,
especially if it has been sitting idle for awhile.
Battery maintenance is easy to do and offers a lot of reward for minimal effort. You probably already
know how to check your car battery - the process is the same for your RV battery. If it isn't a sealed battery,
open the caps and check the fluid; add distilled water if necessary but don't overfill. Check for corrosion around the post and,
if present, clean with a stiff wire brush using a baking soda and water solution.
Some folks recommend smearing a bit of grease or silicone over the posts and
connectors before they are attached. Tighten the connections.
If you have a voltmeter ensure that the voltage between terminals
(with one terminal disconnected) is at least a full 12v. Note that most fully-charged batteries may read higher,
something like 12.7v.
If you do go dry camping, you might want to consider taking along a second 12v battery. But
always keep in mind the weight tradeoff.
| ☞ | |
Disconnect the battery's ground cable whenever you do any kind of work on your rig's 12v electrical system.
|
You should check your battery before going on a trip so you won't encounter any unfortunate
surprises when you get to your destination. You should also carry a good battery checker and battery
charger with you when you travel.
Here's how to read the
expiration date on your 12-v battery.
For even more info, read this extremely good article from BatteryStuff.com for a
detailed discussion of all things battery.
12v system problems
Even with judicious maintenance, problems can occur with your 12v system. The 12v lights can
unexpectedly start dimming or going out completely.
The first thing I check is to make sure the converter box is still plugged into its 120v
source. Sometimes bumpy rides can shake the cord out of its socket. If the converter is still
plugged in, it may have gone bad. This has happened to me because of a lightening strike.
Converter boxes also do go bad all on their own; sometimes they just succumb to old age.
Problems can also occur because of the battery itself. Perhaps it needs charging, which is why you should
carry a portable battery tester and charger. Perhaps it needs distilled water; do you carry any with you? As mentioned
earlier, don't be tempted to use plain drinking water; go get distilled water.
Perhaps the battery has actually gone bad. Batteries have finite life expectancies, which is why you
should carry a battery checker.
Batteries can suddenly cease to function due to bad connections, either at the battery posts or
somewhere down the line. Driving on rough roads can jar things loose, so if your 12v isn't working after a
trip down a particularly bumpy road, this is the first thing you should suspect.
Should you find yourself in the unenviable position of not being able to lower your front jacks because
you have no 12v, you can always jump from your vehicle battery. This is one reason I carry long jumper
cables with me. Your jacks may have a manual crank option; mine don't.
Batteries can be damaged due to heavy current surges or lightening strikes. The only solution here is to replace
it. I've found Walmart to be a good source for reasonably priced deep cycle batteries. But if it makes you feel
better you can always get one from an RV dealer. In any case, be sure to take the old one with you so you can
get a refund on the old carcass.
120 volt systems
-- aka 110v
-- distribution system == breaker panel
First off, let's clear up some confusion. You will see discussions of things like house current where some
talk about 120 volts and others talk about 110 volts. So what's the difference? The answer is, none. They are
different terms for the same concept and can be used interchangeably. Power generated by the power company
starts out as 120 volts (the "nominal" voltage), but line drops such as transmission losses often reduce
the voltage to somewhere
around 110 volts by the time it gets to your circuit breaker panel and down the line to your appliances.
As a result, you can expect voltages to vary somewhere between 120v and 110v. Most everyday home
and business appliances are engineered to operate in the range between the two.
Ok. Now we can comfortably discuss 120v and know that we are actually talking about 120 to 110 volts.
Regarding your rig, you will encounter campground electric hookups that provide current with amperages
of 20A, 30A or 50A. Each of these has its own ramifications.
The following items require 120v service in order to operate correctly:
- Air conditioner(s)
- Water heater
- Furnace
- Refrigerator
- Microwave
- Central vacuum
- Converter
- Electric outlets, including GFI
The following table shows rule-of-thumb minimum wire sizes for various current draws. This
table was not taken from an official source but rather shows general guidelines for 120v
hookups. Increase wire size by one for runs greater than 100 feet.
| Length | 15A | 20A | 30A | 50A | 100A |
| 25 feet | #14 | #12 | #10 | #8 | #6 |
| 50 feet | #12 | #10 | #8 | #6 | #4 |
| 100 feet | #10 | #8 | #6 | #4 | #1 |
Remember that these are only guidelines. Do some research if you think you have
unusual circumstances. Also bear in mind that wire size increases may be called for
in unusual circumstances such as bundled or coated wires than cannot expend heat as well.
Circuit breaker and fuse panel
All of your 120v and 12v electrical systems and appliances go through a panel that contains
a bank of 120v circuit breakers and a bank of 12v fuses. Mine is located under one of the stairs.
The circuit breakers have different
amperage ratings depending on what they are servicing; for example, 20A for A/C,
and 15A for most other things. The fuses likewise have different amperage ratings, like 20A for
slideouts and 15A for lights.
Here is
a diagram of the panel on my particular fifth-wheel. Your's is likely to be similar.
I always carry spare fuses with me when we travel, a couple extras for each of the different
amp ratings. It's probably not worth taking spare circuit breakers as they rarely if break.
One peculiarity of most fifth-wheels is that the fuse for the front jacks is not in the
fuse panel box. On our rig it lives in the overhead part of the front storage compartment where the jacks are.
If this is the same for your rig, you can easily find the fuse by tracing the jack wiring until you
come to the fuse holder. I also carry several spares for this fuse since I have burnt it out several times
when I put too much strain on the jacks.
15/20 amp service
This is commonly referred to as ordianry house current.
Unless your rig is specifically designed to do so, DO NOT expect everything
to work normally when connected to 15/20A service. You
definitely will not be able to run two a/c units at the same time.
In fact, you might not be able to run one;
a single a/c unit will normally require 30 amps. Consider one or more house fans as an alternative.
Microwave ovens, toasters and
hair dryers are known power hogs and can easily throw a breaker, especially if used together at
the same time.
That said, you may have to hook up to 15/20 amp service from time to time. The classic example
is dry camping - your generator may not be able to output more than 15/20A. Experienced dry campers
develop a routine of frugality and tend to limit themselves to 12v lighting, and using power-hungry
appliances sparingly and one at a time. Another reason for using 15/20A is if you park at a friend's
house and hook up to their house current.
|
Here are a couple caveats. You will likely need to get an adapter to plug into your 30/50A power cord.
Some smaller rigs will have built-in 120v sockets, but most larger rigs will not. When you buy an
adapter be sure that one end fits into your rig's 30A or 50A socket and the other end has a male connector
for a standard
3-prong 120v line. The other caveat is to use as short an extension cord as you can get away with, as longer
lines can lead to overheating problems. If your extension cord gets too hot to hold, it's trying to
tell you something!
The photo at right shows a typical 15-to-30 amp receptacle adapter that can be found on Amazon. There
are others, so shop around.
| | |

|
30 amp service
|
The 30 amp hookup boxes that you'll find at RV parks have 3-prong receptacles like the one
shown at right.
See here and
here
for good discussions of 30 amp RV wiring. For the geeks among you, RV 30A plugs are defined by
ANSI standard TT-30P (the plug) and
TT-30R (the receptacle). For the less geekish among us, the plug is simply known as RV 30.
More geek: 30A @ 120V = 3600 watts [amps * volts = watts].
|
|

|
A 30A RV plug looks similar to the 240v plug you see for household dryers or water heaters,
but they ARE NOT interchangable - don't even think about trying it! For one thing, 240v house plugs
are wired with two hot lines; RV 30A plugs are 120v with only one hot wire - the other two are
for neutral and ground. See the links above for more detailed info.
If you need to buy a replacement plug, go to an RV dealer, Home Depot, Lowes, Camping World
or an electrical supply house. Make sure you get the RV30 connector and not the 240v water heater type.
And DO NOT try to make your own or use something else.
The cables used to connect between your rig and the hookup box have to be rated for such use.
Don't try to get by with regular 30A extension cords. Your best bet is to get one from an RV
dealer, although it may be a bit more expensive.
30A power cords should be at least 10 gauge.
Finally, although I don't encourage it, you can connect a 30A RV into a 50A campground box.
This may sound dangerous but it's probably ok since the appliances in your rig likely won't draw more than 30A anyway.
Just because the hookup box is able to provide up to 50A of current, that would only be the case
if your rig could somehow draw more than 30 amps at once. For example, rigs designed for 30A normally do not have
more than a single A/C.
Also, bear in mind that your circuit breakers in your rig would likely throw if they detect more than 30A
flowing through them. And also consider your 30A power cord. It cannot handle 50A without causing severe overheating
and this could cause cable damage or, worse, a fire. So be sure to plug your 30A-50A adapter (see below)
directly into the hookup box, not the rig itself.
This immediately converts the current to 30A before it can cause bad things to happen to your power cord.

|
|
[click to enlarge]
|
50 amp service
Most larger rigs use 50A service.
|
You will notice differences between 30A and 50A sockets, plugs and cables. First, 30A sockets and plugs
have three pins; 50A ones have four. Second, 50A cables use fatter (6 gauge)
internal wiring, so the cables are thicker and quite heavier.
The wiring for the two types is also different. 30A cords are wired with 120v on one pin, and neutral and
ground on the other two. 50A cords are wired with 11v on two of the pins, and neutral and ground on the
remaining two.
| |

|

|
|
[click to enlarge]
|
I think that most RVers have no idea that their 50A cord actually provides 240v to their rig's breaker box. There
are, in fact, two circuit breakers on the line, one for each leg of the 240v. The 240v is then split by the
breaker box into two legs, each serving different 120v lines. If you were ever wondering, this is why a
rig with two a/c units has each unit on a separate breaker, the two being located on separate legs.
If you've ever wondered how the 4 pins on your rig's male receptacle are wired, you might fiond the following diagram
useful. Note that the ground (green) pin has a little hook on it. This guarantees that you won't
plug your cord in wrong and cause a big problem.
-- diagram
-- 50A * 2?
-- dielectric grease on the connector when you plug in
-- had to replace - got at dealer - can be found at Home Depot, Lowes, Camping World, elec supply houses
Adapters
Adapters are necessary whenever you park your rig somewhere they don't have the type of hookup you expect.
For example, if your rig operates on 50A and your campground site hookup has 30A then you'll need a 50A-30A
adapter. If you only need 30A but the hookup box serves 50A then you'll need a 30A-50A converter. Also, if you're
parked next to a 15A or 20A outlet and your rig uses either 30A or 50A then you'll need the appropriate converter.
|
In order to hook up a 30A rig to a 50A box you will need a 30A-to-50A adapter,
with a 30A female end and a 50A male end. Some of these
are called "dog bones" because of their appearance. Please note that 30A-to-50A adapters are
the exact opposite of the 50A-to-30A adapters used to hook up a 50A rig to a 30A box;
these have a 30A male end and a 50A female end.
| |

|
IMPORTANT: If you hook up a 30A rig to a 50A box, it is very important that
you place your 50A-to-30A
adapter right at the box itself. This will ensure that you don't have 50A power flowing through
your 30A cord, possibly overheating it and causing big problems.
Non-special purpose
lines and adapters all have female connectors on one end and male on the other.
-- 50A on 30A adapter not protected by internal breaker
-- 50A-to-30A adapters used to hook up a 50A rig to a 30A box;
these have a 30A male end and a 50A female end
12v-to-120v inverter
While most rigs come with converters most do not have inverters, except for possibly the most expensive.
Being unfamiliar with them, questions often asked go something like "What is it? Do I need one? Are there different
types?"
An inverter is a very handy thing to have if you do dry camping. It's purpose is to convert
12v battery voltage into a weak form of 120v current. Basically, it allows you to briefly run 120v
appliances such as TVs, microwaves, hair driers and so on. But don't count on being able to run
power hungry devices like your a/c or fridge for long.
- What is it?
- Do i need one?
- How do I hook it up?
-- ways to wire inverter [http://www.doityourselfrv.com/rv-inverter-install-diy/]
-- different types
-- inverter normally does not come with rig
-- inverter/converter/charger - dont recommend it - tech too new, wait for price to come down, work out the kinks
eschew new Windows versions
-- inverter => emergency use? not good for boondocking - for "pullover" [have generator, but cant run or dont want to]
-- extn cord w/inverter?
-- dedicated inverter receptacle (120v)?
-- should inverter always be connected to battery
Also note that the current produced by a cheap inverter is low, maybe 75 watts. However, if you want
to spend a lot of money on an inverter you can generate up to 75,000 watts but that's probably a little
ridiculous for the average RVer. More typical units would be a 600 watt unit for around $400, or a 3000 watt
unit for around $800. As you can see, inverters are probably luxuries for casual boon dockers. A more
reasonable solution might be a gas and/or propane powered generator. A 3500 watt, 30A gas generator can be
had for around $350.
| ☞ | |
Never try to connect your inverter directly into the AC breaker panel in your rig!. For one thing it just won't supply
enough power to drive all the things fed by that panel. For another, there is too much danger the inverter will
still be connected when you return to shore power and the extra amperage could fry the inverter's electronics.
You can connect the inverter indirectly to the AC panel via what is called a transfer switch (see below).
A better alternative is to wire the inverter up to one or more dedicated outlets in your rig, and mark
them accordingly. An extension cord or two might also be handy.
|
| ☞ | |
Do not, repeat, do not have the inverter's 120v output connected directly or indirectly to either shore or generator
power.
|
| ☞ | |
Also never have your inverter and converter on at the same time. Otherwise you will have a closed loop system
where the inverter is drawing current from the battery, while at the same time the converter is trying to charge it.
|

Inverters typically run from about 75 watts output up to around 5000 watts or more. The lower rated ones are generally
used for utility applications and can be plugged into a vehicle's cigarette lighter. Higher rated ones will
need to be hard-wired to the house battery, as close to the battery as possible. I recommend you use
the lowest gauge wire that will fit your inverter's output terminals.
Here are several ways you can wire up your inverter. You can use standard 14 gauge wire for the 120v outputs.
- Use a transfer switch to connect the inverter to the 120 v AC panel. The switch will automatically switch between
shore (or generator) power and the inverter. Internal circuitry will choose shore power if it is available; if not,
then the inverter will be used.

- Install one or more dedicated AC outlets in the rig. Run normal household Romex wire between the 120v AC outlet(s)
and the inverter. Be sure to mark the dedicated outlets so they won't be used when you're not on the inverter.
- A neat solution that I've seen elsewhere is to install a 15/20A, 30A or 50A female receptacle on the exterior
of your rig. This will be a duplicate of the one you use for shore power. Wire the new receptacle to the output
of your inverter. You can then move your power cord plug between the inverter-connected receptacle and the
normal shore power one. The beauty of this solution is that it allows you to use your normal receptacles in the
rig without having to deal with dedicated receptacles. Make sure your inverter has enough power to do this, though.
How much power should you look for when deciding to get an inverter? Here's a cheapo calculation that should serve.
Multiply
the highest breaker amperage by 120 to get the minimum wattage you need. For example, if your highest breaker draws
30A for the air conditioner, you will need as a minimum 120 x 30 = 3600 watts. But notice you might not be able to
run many other things while the A/C is on, and you certainly can't run two A/C units. The moral is that if you have
a big rig with lots of appliances, get an inverter with the most wattage output as you can afford. Also make sure
that it's a
pure sine wave inverter.
Since inverters (like converters) have inherent inefficiencies, they will drain the battery much sooner than you
would like. Due to heat loss this will happen even if you do not have any 120v appliances plugged in.
120v maintenance and repair
There won't normally be much for you to do in the way of maintaining your electrical system,
other than periodically checking battery fluids and connections. But
what do you do when something does go awry?
The most dreaded electrical system problem is when power just completely goes out,
especially at night. What you
look for depends on whether it is the 100v or the 12v that fails.
Here are some typical causes of partial or complete power failures,
listed in order of likely causes.
- Switch on hookup box not switched to "on"
- Thrown circuit breakers, either in your rig or at the campground's power source
- Thrown GFI receptacle
- Bad hookup box receptacle
- Bad rig receptacle
- Power surges (see below)
- Inadequate wire size
- Loose connections, perhaps due to vibrations
- A short in the line
- Burned-out parts such as receptacles or circuit breakers
- Bad wiring, maybe by an unwitting electrician who thought your 30A receptacle
should be wired like a house close dryer outlet
- others
|
If you don't have a voltage detector, get one. It's hard to trace down electrical failures without one.
I prefer the kind that looks like a fat ball point pen,
and either lights up or beeps (or both) when voltage is detected. They work by detecting the flux generated by
alternating current; therefore, you only need to place them next to an electric line to see if current
is flowing. The type shown at the right can detect voltages from 12v up to 1000v. They can generally be had for
around $20 US.
|

|
Let's start out with tracking down 120v outages. The likely starting point would be the hookup box outside.
Check to make sure that the cord is securely plugged into the box. I once spent an embarrassing hour or so localizing
a power failure only to discover that the plug had come loose from the box because I had earlier pulled the trailer
up a couple feet. Also check to see if there is a switch on the box that turns electricity on and off. I have
overlooked this often enough that it is now one of the first things I check. If you're sure you have power at the box (by testing it with your handy-dandy voltage detector), make sure
the line is still securely plugged into the female receptacle on your rig.
The next logical thing to check is to see if the main circuit breaker in your rig has been thrown.
Just to be sure, you
can throw it back and forth and see what happens. Depending on how your breaker box is laid out, you may be
able to test the main with your voltage detector, but maybe not. This would also be a good time to check all
the other breakers in the box to see if any have been flipped. It is also possible albeit unusual to have a
circuit breaker dysfunction.
By the way, although it doesn't happen often it is possible that a campground circuit breaker has been thrown.
This has happened a couple times to me, and I had to go find campground personnel to reset them. This would
most likely be the culprit if your tester shows you have no power at the box. And don't discount the
possibility that the box receptacle itself may be bad. This has also happened to me at least once.
Less frequent causes of problems include plugs going bad on either end of your electric cord.
I have seen a neighbor camper's 30A cord end burnt out, presumably due to overloading. Also,
your rig's male receptacle going bad is not out of the realm of possibility;
this is especially true if you do a lot of wiggling around when connecting up your cord.
-- maintenance - grounding, secure mechanical connections, test with detector, multimeter
So what do you do if all these things are fine and the problem still exists? You've checked everything
from the campground hookup all the way up to your circuit breaker box and everything looks ok. Well, it's probably
time to get a professional. Either take your rig down to a dealer, or try to find out if
there is a mobile RV repair service in the area. I wouldn't recommend hiring a non-RV electrician
because they generally are not experienced in the pecularities of RV wiring. This may be a
last resort, but be prepared for a hefty bill. Oh, don't forget to ask at the campground
office if they know anyone in the area that does RV electric.
-- vibrations
-- insulation
-- short
-- unplugged converter
-- reset GFI
--
Electrical problems
If you are connected to an electrical hookup but are not getting power to the unit,
look for the following: (a) the circuit breaker at the hookup box is not on [usually
in the up position], (b) the plug is pushed in all the way, (c) all adaptors and voltage
protectors are snug, and (d) the other end of the line is snugly pushed into the trailer.
Embarrassing as it is to say, I once had a plug come out of the hookup box when I pulled
the trailer up a few feet to better line up with the sewer connection. I did all kind
of electrical troubleshooting before I finally decided to go out and check the plug. Doh!
If your 120 is fine but the 12 v lights are dim, make sure that your converter box is
plugged into a 120 receptacle. I once had the plug fall out due to travelling on a
particularly bumpy stretch of road in Newfoundland. A bad or dead battery can also
cause 12 v problems.
If you are connected to an electrical hookup but are not getting power to the unit, look for the following:
(a) the circuit breaker at the hookup box is not on [usually in the up position], (b) the plug is pushed in
all the way, (c) all adaptors and voltage protectors are snug, and (d) the other end of the line is
snugly pushed into the trailer. Embarrassing as it is to say, I once had a plug come out of the hookup
box when I pulled the trailer up a few feet to better line up with the sewer connection. I did all kind
of electrical troubleshooting before I finally decided to go out and check the plug. Doh!
If your 120 is fine but the 12 v lights are dim, make sure that your converter box is plugged into a 120
receptacle. I once had the plug fall out due to travelling on a particularly bumpy stretch of road in Newfoundland.
A bad or dead battery can also cause 12 v problems.
120v appliance loads
The following table shows average current draw for typical RV appliances.
Your particular devices may draw more or less current than shown in the table.
The chart is meant only for guidelines as to what combination of appliances you can
safely run using your 20A, 30A or 50A service. Notice especially why running two
a/c units on 30A service is a bad idea and is likely to kick one or more of your breakers.
Note that any appliance that draws more than 8 or 9 amps can be thought of as a "power hog"
and should be used with caution when hooked up to a 30A line or less.
| Appliance | *
Current
(in amps) |
Comments |
| Washer dryer - twin - large | 30 | |
| Microwave | 20 | At startup; 15A after startup |
| Air conditioner(avg 14K BTU rooftop) | 15 | Startup draw; 7A after startup |
| Furnace fan, 1/3 hp | 14 | |
| Hair dryer | 13 | Less powerful hair dryers might be better for RV use |
| Water heater - 6 gal | 12 | While in 120v mode; no current draw in gas mode |
| Space heater | 11 | |
| Central vacuum | 11 | |
| Toaster, toaster oven | 10 | |
| Hot plate | 10 | |
| Refrigerator/freezer | 10 | In 120v mode, not gas |
| Electric frying pan | 10 | |
| Waffle iron | 10 | |
| Clothes iron | 10 | |
| Coffee maker | 9 | While making coffee; ? while keeping warm |
| Food processor | 9 | |
| Hair dryer | 8 | |
| Winegard RV-7042 wall-mounted TV/cable switch 12v outlet | 8 | |
| Battery charger | 8 | |
| Electric stove element | 7 | |
| Curling iron | 6 | |
| Converter | 6 | While charging battery(s) |
| Curling iron | 5 | |
| Electric drill | 5 | |
| Coffee pot | 5 | |
| Corn popper | 5 | |
| Food processor | 4 | |
| Digital TV | 3 | |
| Computer | 3 | Desktop; 1A for laptop; 2A for printer |
| 12v lights | ? | |
| Electric broom | 3 | |
| Blender | 3 | |
| Electric blanket | 3 | |
| Satellite dish & receiver | 2 | |
| Small vacuum | 2 | |
| Crock pot | 2 | |
| Hand vacuum | 2 | |
| Electric fan | 2 | |
| Can opener | 2 | |
| Heating pad | 2 | |
| Winegard RV-7042 wall-mounted cable connector | 2 | |
| Mixer | 1 | |
| Radio, stereo, DVD, VCR | 1 | |
| LED mini-lights; eg Christmas | 1 | |
| Electric shaver | 1 | |
Generators
-- our gen is gas/propane
-- dont leave gas in generator for long time, will clog up
-- pushers usually have on-board generator
Surge protector
To protect all the electrical goodies in your rig, you should consider getting a surge
protector. Its function is similar to the ones used in household applications, such as
protecting a computer from voltage or current spikes. But they do look different.
-- picture
Surge protectors connect in-line with your 20A, 30A or 50A power cord, and can sit
anywhere between the hookup box and your rig's male receptacle. For example, one
conceivable situation, working from the rig to the box, might be a 50A power cord,
then a 50A surge protector, and finally a 50A-to-30A adapter which plugs into the campground's
30A hookup box.
My advice is to buy the best surge protector you can afford. In the event of power surges,
no protector or a poor protector can result in severe damage to your rig's electronics, your
a/c units, your fridge or your converter box - or all of the above.
Power surges can arise from a number of situations:
- excessive power increases from the power company
- mis-wired hookup boxes or rig receptacles
- old, worn power hookup box receptacles
- lightning strikes
How can a receptacle get mis-wired, you ask? ---
-- Electrical Monitoring System
Solar power
Boondockers should give some consideration to whether the solar option might be
right for them. Solar panels are becoming more and more popular, especially because
sizes and prices continue to fall.
-- picture
I ran across
this DVD item
while doing some searches on the internet. I haven't purchased it
myself, but if you consider yourself a rank newbie when it comes to RV electrical systems,
it may be worth a try. I make no warrants about its content or usefulness.
Elec problems:
fuses & circuit breakers - do you have extras?
converter might have come unplugged, especially on bumpy roads
site elec box - do you have a multimeter?
trailer receptacle for plug
elec line - do you have an extra?
-- my ground pin broke off, but no worries
-- on RVs frame is usually positive